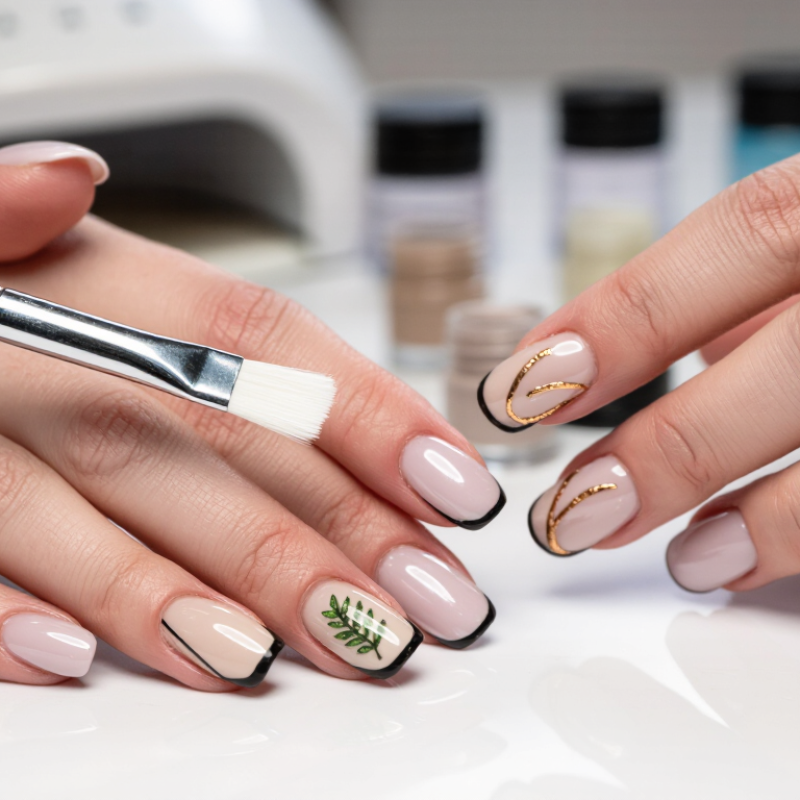
Liner Gel Nail Art can turn a simple manicure into fine, deliberate detail: a crisp outline, a tiny leaf, or a curved line across a glossy base. The product’s thicker texture gives artists more control than many runny nail paints, but it does not make every stroke effortless. Small details matter. A clean, dry nail surface, a suitable brush, and a steady hand all help.
Nail chemist Doug Schoon’s safety guidance is often expressed as: “All nail products are safe when used as directed.” That principle matters when working with liner gel. Follow the product’s instructions, keep uncured gel off the skin, and use the specified curing lamp and time. Liner gels vary, so one brand’s application method should not automatically be applied to another.
This guide explores how to prepare the nail, load a fine liner brush, and create controlled strokes without flooding the cuticle. You will also learn how to cure the design and correct common issues, such as uneven lines or gel collecting at the brush tip. Expect to practice. Even experienced artists can produce a wobble, and it is worth asking why: was the brush overloaded, or did the hand move too quickly? A small test line on a practice surface can reveal more than repeated guessing. The goal is not a flawless first attempt; it is a neat, durable design made with care.
Liner gel is a nail-art gel designed for precise details, such as fine outlines, pinstripes, lettering, and small floral strokes. Its texture is often thicker than ordinary color gel, helping a line stay where it is placed instead of spreading quickly. Formulas vary, though, so test a small stroke before starting a detailed design. A smooth, cured base gives the gel a more predictable surface.
A few tools make control easier: a fine liner brush, a small palette or mixing tile, and a suitable nail lamp. Short brushes can feel steadier for tiny curves; longer bristles can draw continuous lines across the nail. Keep a lint-free wipe nearby for cleaning the brush according to its care instructions. Less is easier. Pick up a small bead of gel, then roll the brush gently to shape its tip.
Work in thin strokes and avoid flooding the cuticle or touching skin. Keep it thin. Cure the design using the lamp and timing specified for the gel; a thick line may not cure evenly. I still find that curved lines can wobble when I rush, so resting the side of my hand on the table helps. If the brush starts dragging, pause and clean it rather than pressing harder.
Clean and dry the nail plate before applying liner gel. Gently push back the cuticle, then lightly remove surface shine with a fine-grit file. Avoid aggressive buffing; a thin, intact nail plate is easier to work on. Brush away dust and use a lint-free wipe with the cleanser recommended for your gel system. Keep the cuticle area free of oil and moisture, since residue can contribute to lifting. Small details matter.
Set up a steady table with bright, neutral lighting, a dust collector, and good room ventilation. Arrange the gel, palette, fine liner brush, wipes, and curing lamp within reach; close containers when they are not in use. A 2023 Nature Communications study found that 20 minutes of nail-dryer radiation caused about 20–30% cell death in cultured cells. This laboratory finding does not measure salon users’ cancer risk, but it supports limiting unnecessary lamp exposure. Cure only as directed for the product, and consider fingerless UV-protective gloves.
Tips: Test brush flow on a palette first. If the line spreads, check for excess gel before touching the nail. Rushing this step is an easy mistake—even careful preparation cannot fix a brush loaded too heavily.
Liner gel works best when the brush carries a small, even bead—not a heavy blob. Roll the cap gently between your fingers, then wipe one side of the brush against the bottle neck. Keep the other side lightly coated. Too much gel can spread into thick, uneven lines. Too little may skip across the nail. A steady hand helps, but so does resting your wrist on the table.
For fine stripes, hold the brush near its base and draw from the wrist, not just your fingertips. Practice on a nail tip first. Short strokes are easier to control than one ambitious sweep. Cure the gel according to its product directions and compatible lamp guidance; avoid touching uncured gel to skin. One imperfect line? Clean it up before curing, if the product instructions allow. I still find that a slightly slower pull can make a line wobble, so pause and reset rather than pressing harder.
Grand View Research’s 2023 nail care market report valued the global market at USD 23.41 billion, reflecting broad interest in nail products—not proof that every technique is easy.
Practice matters.
How to Use Liner Gel for Nail Art?
Clean lines start with a steady setup, not a heavy hand. Prep the nail, apply your base color, and cure it as directed. Choose a fine liner brush and wipe away excess gel; a small bead is easier to control. Rest your drawing hand on the table, then turn the client’s finger to follow the nail’s curve. Pull each stroke slowly, keeping the brush tip lightly in contact with the surface. Keep it thin. If a line wobbles, refine it before curing rather than stacking on more gel. Avoid touching skin, and follow the product’s curing instructions.
Build designs in clear stages. Sketch long outlines first, then add dots, borders, or short cross-lines after curing each layer. For a simple leaf, draw a curved stem, add two narrow strokes, and leave small gaps so the design does not look crowded. Thin layers help details stay crisp; a thick bead can spread and blur an edge. A tiny imperfection happens. Pause, check the line from above, and correct only what distracts. The U.S. Bureau of Labor Statistics projects employment for manicurists and pedicurists to grow 9% from 2023 to 2033, faster than the average for all occupations. That professional outlook makes repeatable technique valuable, though a report cannot replace practice on real nail shapes. Practice curves on a nail wheel first, and note which brush pressure gives you the cleanest stroke.
Once the liner gel design is complete, cure it according to the gel and lamp instructions. The lamp must suit the gel, and the layer should stay thin. Thick strokes can cure unevenly, even when the surface looks set. Keep gel off the skin; remove any smudge before curing. If the line feels bulky, I’d rather refine it than add another heavy layer. That judgment can be imperfect, so check the design from the side as well as above.
Tips: Use short curing intervals only if the product instructions allow them. Keep the lamp clean, and place each nail fully inside it. Don’t guess at curing time.
After curing, apply a compatible top coat in a thin, even layer. Seal the free edge with a light stroke, but avoid flooding the cuticle area. Cure again as directed. Some gels leave a tacky surface; wipe it only if the instructions call for that step. For upkeep, use cuticle oil around the nail, not over the design, and avoid picking at lifted gel. If the design chips or lifts, follow the product’s removal directions instead of covering the damage. Keep an eye on the edges; small gaps can be easy to miss.
| Stage | What to Do | Practical Guide | Curing or Sealing | Check Before Moving On |
|---|---|---|---|---|
| 1. Prepare the nail | Shape the nail, gently prepare the surface, remove dust, and apply the compatible base and color layers. | Keep product off the skin and cuticle area. Follow the base and color product instructions. | Cure each layer for the time specified for that product and lamp. | The surface is clean, and each underlying layer has been cured as directed. |
| 2. Plan the design | Choose the line, curve, or detail and select a suitable fine liner brush. | Use a small amount of liner gel. Wipe excess gel from the brush to help create controlled, even strokes. | Do not cure until the design is complete, unless you are curing separate design sections intentionally. | The gel is placed only where the design is intended and has not touched the surrounding skin. |
| 3. Apply the liner gel | Paint the design in smooth, deliberate strokes. | Work in a thin, even layer. For intricate artwork, build detail gradually rather than applying a thick blob of gel. | Keep the hand out of the lamp until the design is ready to cure. Cure promptly according to the gel instructions. | Check that lines are even and that gel has not pooled around the edges. |
| 4. Cure the design | Place the hand flat in a compatible UV or LED nail lamp. | Use the lamp type and exposure time specified by the liner-gel manufacturer. Cure time varies with the formula, pigment, layer thickness, and lamp. | There is no single cure time for all liner gels. Do not rely on appearance alone to determine whether gel is fully cured. | Follow the product directions, position the nail where it receives the lamp’s light, and avoid curing gel that has contacted skin. |
| 5. Apply a top coat | Once the design is cured, apply a compatible top coat over the artwork and nail surface. | Use a smooth, even layer and cover the free edge if the top-coat instructions recommend it. | Cure the top coat for its specified time using the required lamp. | Check that the artwork is fully covered and that top coat has not flooded the cuticle or sidewalls. |
| 6. Finish the surface | Complete any final step required by the top-coat product. | Some top coats leave a tacky inhibition layer; others are no-wipe. Do not wipe a no-wipe top coat. | If the instructions call for wiping, use the recommended cleanser and a lint-free pad after curing. | The finish is smooth and dry to the touch where the product is designed to be no-wipe. |
| 7. Maintain the design | Protect the manicure during everyday tasks and keep nails and surrounding skin moisturized. | Wear gloves for prolonged exposure to water or household cleaning products. Avoid picking or peeling the coating. | Do not add extra curing as a substitute for correct application or the product’s stated curing directions. | If the coating lifts, cracks, or causes irritation, stop using it and follow appropriate removal guidance. |
| Important safety note | Uncured gel can cause skin sensitization. Avoid skin contact, remove any uncured product from the skin before curing, and follow the product and lamp instructions. If irritation or an allergic reaction occurs, discontinue use and seek professional medical advice. | |||