Best Gel Nail Designs and Tips for Perfect Home Manicure
The popularity of Gel Nail manicures has surged in recent years, with the global market projected to reach over $6 billion by 2025. This booming industry reflects not only the growing consumer demand for long-lasting and vibrant nail designs but also the increased interest in DIY nail care at home. According to a report by the Nail Industry Council, approximately 50% of consumers are turning to home manicures, especially during public health challenges that limit access to salons.
Experts in the field, such as Dr. Lisa Hartman, a leading industry consultant, emphasize the importance of proper technique to achieve the best results at home. Dr. Hartman states, "The key to a successful Gel Nail application lies in preparation and practice, ensuring that the nails are clean and the right products are used." With the right guidance and tips, anyone can replicate the professional manicure experience without setting foot in a salon.
This article will explore the best Gel Nail designs and offer practical advice to help you achieve the perfect home manicure, blending creativity with the emerging trends that are redefining this vibrant industry.
Types of Gel Nail Designs for Stunning Home Manicures
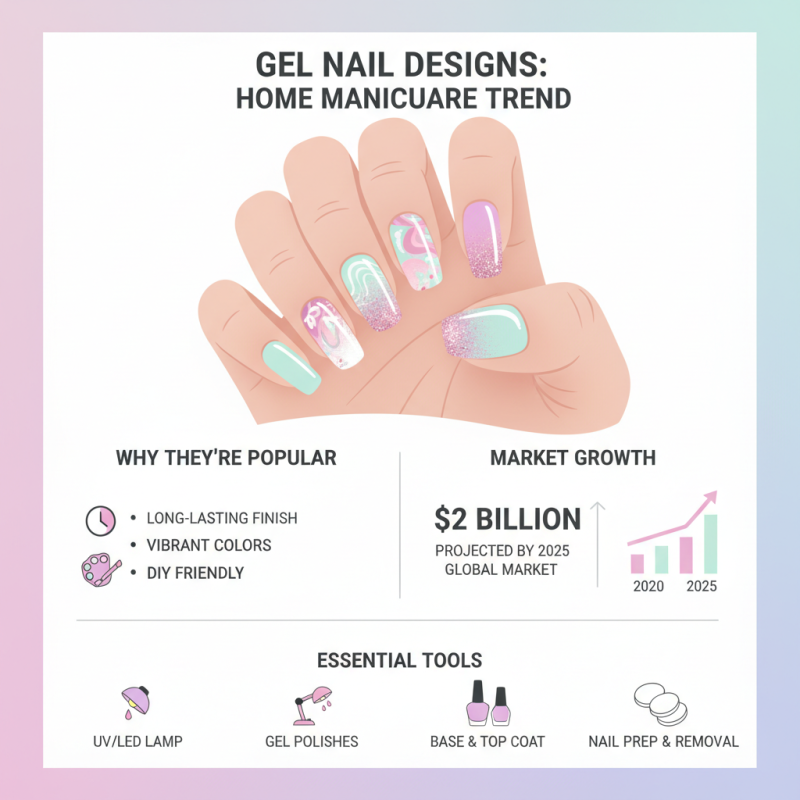
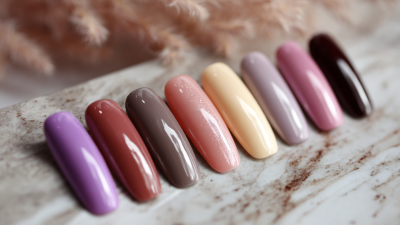
Gel nail designs have surged in popularity, becoming a favorite choice for at-home manicures due to their long-lasting and vibrant finishes. According to a recent industry report, the global gel manicure market is projected to reach $2 billion by 2025, indicating a growing trend among consumers seeking durable and aesthetically pleasing nail options. With a variety of designs available, individuals can easily transform their nails using just a few essential tools.
Among the plethora of gel nail designs, minimalist patterns have become increasingly sought after. Simple chic designs, such as negative space art and geometric shapes, appeal to those who prefer a subtle yet elegant look. Furthermore, a focus on bold colors and intricate nail art—such as floral patterns and foil accents—provides endless possibilities for self-expression. In fact, a survey revealed that 60% of consumers prefer unique nail art styles that reflect their personality, supporting the notion that gel nails are not just a beauty routine but a form of artistic expression.
Essential tips for achieving stunning gel nail designs at home include investing in quality products and mastering proper application techniques. Industry professionals recommend the use of a LED lamp for curing the gel, as this enhances durability and reduces drying time. Additionally, ensuring a clean surface before application can significantly improve the adherence and finish of the design. With the right techniques and creativity, anyone can achieve salon-quality results in the comfort of their own home.
Essential Tools and Products for Gel Nail Application
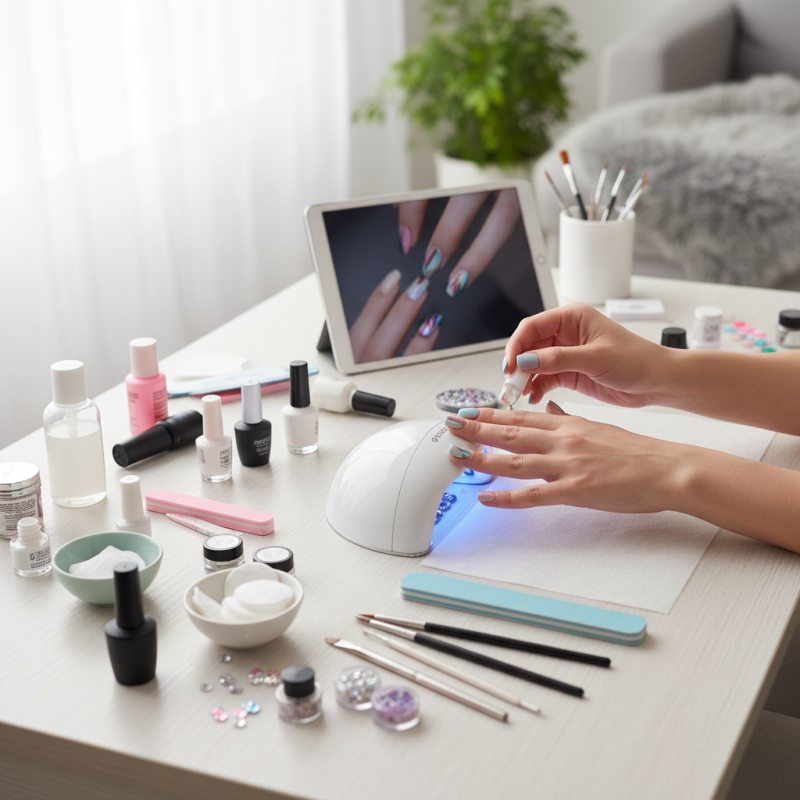
When it comes to achieving a flawless gel manicure at home, having the right tools and products is essential. Firstly, a UV or LED lamp is a must-have for curing the gel polish, allowing it to harden and ensuring longevity. Invest in a quality lamp that provides even light distribution for consistent results. Along with the lamp, a good gel base coat and top coat are crucial for a perfect finish. These products not only enhance the durability of your nails but also add a glossy shine that makes your manicure pop.
In addition to these core products, you should equip yourself with a variety of nail files, buffers, and cuticle pushers. A fine-grit file is ideal for shaping your nails, while a buffer helps to create a smooth surface that allows the gel to adhere better. Cuticle care is equally important; using a cuticle remover and pusher will ensure that your nails look neat and professionally done. Lastly, having alcohol wipes on hand is beneficial for cleaning the nail surface before application and removing any sticky residue post-curing, providing a polished look to your home manicure. With these essential tools and products, you can achieve salon-quality gel nails right from the comfort of your home.
Step-by-Step Guide to Achieving Flawless Gel Nails
Achieving perfectly manicured gel nails at home can be a rewarding experience with the right techniques and tools. Start by preparing your nails; remove any existing polish and gently file your nails into your desired shape.
Push back your cuticles and ensure your nail beds are clean and free from oils and debris. Apply a base coat to create a smooth surface and protect your natural nails. This step is crucial for ensuring better adhesion of the gel polish.
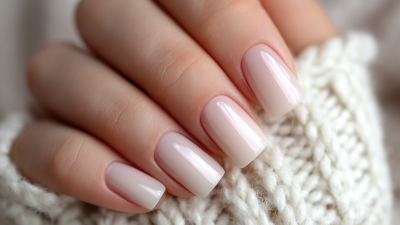
Once your base is set, select your favorite gel polish and apply it in thin, even coats. Be sure to cure each coat under a UV or LED lamp for the recommended time. This is essential for achieving that durable and glossy finish. After applying the color, finish with a top coat to seal in the color and add shine. Don’t forget to cure the top coat as well! Finally, clean any tacky residue with a cleansing solution to reveal your gorgeous gel nails. With practice, you’ll master the art of the home gel manicure and enjoy beautiful, long-lasting nails.
Tips for Maintaining and Removing Gel Nail Polish Safely
When it comes to maintaining and removing gel nail polish safely, it's crucial to follow best practices to protect your natural nails. According to a report by the International Nail Technicians Association, improper removal of gel polish can lead to significant nail damage, including thinning and brittleness. A survey indicated that over 60% of individuals who frequently use gel polish experience weakened nails, making safe removal techniques essential. Using acetone products, which are commonly utilized for gel removal, should be done with care. Experts recommend soaking the nails in acetone for no longer than 10-15 minutes and using a gentle scraping tool to minimize damage.
To further enhance the safety of gel nail removal, incorporating a moisturizing routine is beneficial. Nail technicians emphasize the importance of hydrating the nail beds and cuticles post-removal. A study published in the Journal of Cosmetic Dermatology found that regularly moisturizing nails can improve their strength by up to 40%. Incorporating vitamin E oil or cuticle cream can aid in restoring moisture levels, preventing dryness and ensuring your nails remain healthy. By following these recommended practices, you can enjoy the beauty of gel nails while maintaining the integrity of your natural nails.
Common Mistakes to Avoid in DIY Gel Nail Manicures
When it comes to DIY gel nail manicures, there are several common mistakes that can quickly turn your at-home experience into a frustrating one.
One significant mistake is skipping the prep work. Properly preparing your nails is crucial; this involves cleaning, buffing, and ensuring your nails are free of oils.
Neglecting this step can lead to poor adhesion and chipping, severely affecting the longevity of your manicure.
Remember, a clean nail surface is the foundation for a flawless gel application.
Another frequent error is applying gel too thickly. Many people think that thicker layers will provide better opacity and durability, but this is not the case.
Thick applications can result in uneven curing, which may cause lifting or bubbles. Instead, focus on applying thin, even layers;
this will create a smoother finish and ensure that the gel cures properly under the UV or LED lamp.
Additionally, be mindful of your curing times; over or under-curing can compromise the overall quality of your manicure, leading to disappointing results.
By avoiding these common pitfalls, you can achieve a salon-worthy gel manicure right at home.